Project Deny - Week 7
- Emily Brown

- Mar 8, 2020
- 3 min read
This blog will be updated every week until May 1st, this will follow the production of my final year project at University, in the subject of Games Art.
Welcome back to the blog!! Well we're half way through now, and I've been working my ass off lately on a new shader.
Project Overview
As a refresher, I am working on a game-ready environment based on Nacho Yague's concept art from Watch Dogs 2. Last week I updated you guys I had created some simple tileable materials for the scene, just so I can mess around and start to learn Substance Designer a bit better.
Current Progress
Since last week I decided Id take a break from making tileable materials and create the decal sheet for the scene. So then I can get an easier understanding of what other materials I need to make. (aka I havent planned anything)
I wrote down a list of assets that needed details such as buttons, hdmi ports, dvi ports, audio ports, dvd slots, etc. Then from there I started to plan out what to add to my decal sheet.
I went searching around for some references to base this sheet off so I could start modelling it.
The plan was to create a model for each decal and then bake it onto a plane in Substance Painter, to then texture.

Mesh Decal Sheet
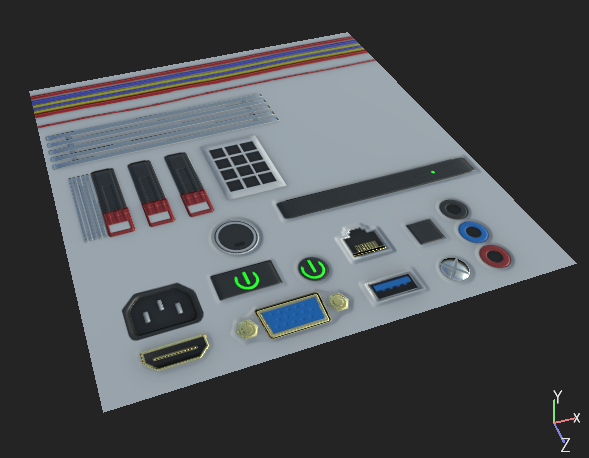
Mesh Decal Sheet (Post Texturing)
I wanted to keep it simple due to the camera angles I have set up for my final shots. So I didn't go into too much detail. However now that that is done, I have been adding them to some of the asset which you will see at a further blog. It's really easy because it's like sticking stickers on blocks.
In engine I will be adding a mask to the decal sheet so that the decals can blend into the assets a lot easier with their master materials.
Another thing I have done this week is work on the LCD screens, I found it was about time I did this as it's a huge part of my scene that tells the story and narrative that I have planned.
As someone with next to no knowledge of creating materials in Unreal Engine 4, I went to Artstation and had a look around to see if anyone had any breakdowns. Luckily I came across a simple breakdown by Harley Wilson from Ubisoft.
Guidance: https://www.artstation.com/artwork/GwXzd
So I followed his breakdown, but when I had it complete I came across a few issues.
Issue 1: I couldn't see any of the RGB subpixels on the material created, this was because I forgot to add a value to the parameter I made for it.

Simple fix went into the material instance and put it up and it worked.

Issue 2: When I moved the material instance to one of the assets with a screen, for example the monitor. The material just wouldn't align properly to the screen.

At first I thought it was an issue with the UVs on the mesh, so I went through that to double check everything was layed out correctly. Everything was fine.
So my next thought was the material itself again.

So I was thinking it could be the mask that was made to give the screen an edge, so I removed that. Nothing changed.
Oh but no it was just me being stupid again.
As I mentioned earlier this material is a material instance on the mesh, when I was messing around with the testing of this matertial, I had put in an image which hadn't been set to the right size.

So as I had set up the material to set up with parameters so I can easily change the image in the future, all I needed to do was change the image to the right size. And then everything worked.

It wouldn't be my work if I didn't create a meme out of it.
But now that material is setup it will make it so much easier in the future for putting my narative in place.
Whats Next?
Next week Im going to get the textures for some of the assets complete. I think I'm going to focus on the monitors and TVs first as they are the main assets for my scene.
Catch you all later ;)
Em x


Comments